
How to Build Retaining Wall Using Railroad Ties
Posted by A&K Railroad Materials on Feb 4th 2021
Building a retaining wall:
Securing Ties
Now that you have done all of the steps in our previous blog post. you might be wondering how to secure your railroad ties and create a solid retaining wall. There are two best practices when securing a retaining wall: Deadman Ties and Rebar. Railroad ties can be used for much more than just retaining walls. We have seen customers build furniture, flower beds and much more using railroad ties. Let us get into it!
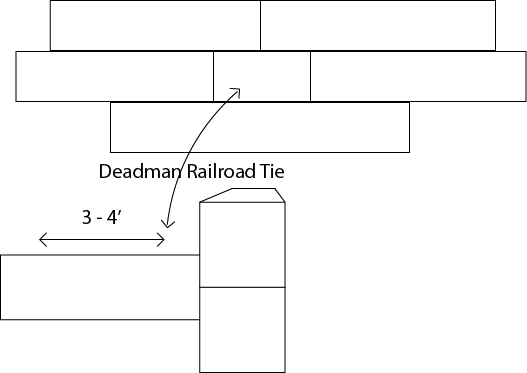
What is a Deadman railroad tie?
A Deadman railroad tie is a railroad tie that runs perpendicular to the retaining wall and into the hill that you are building the retaining wall against. Deadman ties are great for ensuring the retaining wall is as solid as possible. We recommend using a deadman railroad tie every 20 feet of your retaining wall. If you are building a retaining wall with the distance spanning less than 20 feet, one dead man railroad tie in the center of the wall is enough. We have had contractors use a deadman railroad tie at the end and center of the wall guaranteeing the structural integrity of the retaining wall. Purchasing a deadman railroad tie is easy. While checking out just let us know you what lengths you would like the railroad tie cut. Start shopping here.
How to secure ties using rebar?
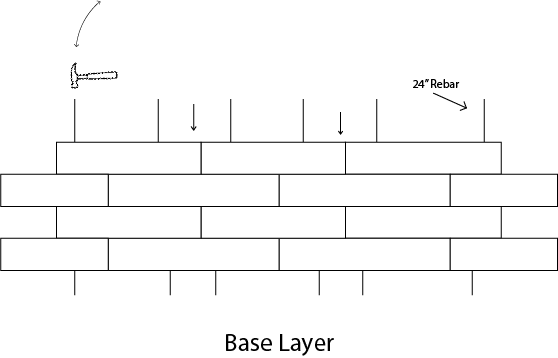
Securing railroad ties is done best using our pre-cut lengths of rebar through two railroad ties at a time. Starting with your base railroad ties two railroad ties at a time then moving up the height of the wall from there. Referencing our previous blog, you start the retaining wall by leveling the ground underneath then placing the first layer of ties on top. Next comes the staggering of railroad ties; you want to be sure the ties are 6” to 1’ staggered on each level.

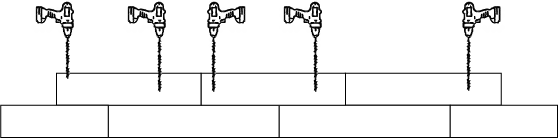
After you have started staggering the railroad ties you will need to secure or bid them together. Securing railroad ties is best done two railroad ties at a time with two pieces of rebar, one on each side of the tie. See below example.
Start by drilling a 3/8” hole where you want the rebar to hold the railroad tie together. Now you might be wondering why you would drill a 3/8 hole instead of a ½”? We recommend using a 3/8” hole because it will allow the rebar to be tight inside both of the railroad ties you are securing together. This tightness helps hold the railroad ties into the position and keeps the holes from growing larger than the rebar themselves. Hammering the rebar into the railroad tie helps significantly and saves the hand the pain from trying to push the rebar into the railroad ties. Always wear gloves!!!
After you have predrilled you can then hammer your rebar into the ties making sure to secure the rebar into the ground 6 inches.
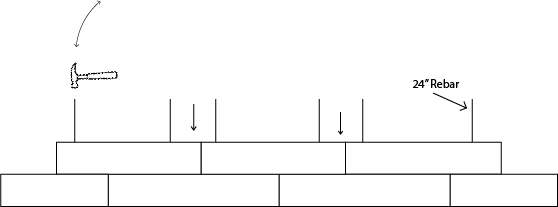
After you have secured the first layer of railroad ties you want to begin on the next. Starting six inches from your rebar that has now secured your base layer or railroad ties, you want to drill a single 3/8” hole on each side of the railroad tie. Then mark on the side of the railroad tie that faces out or towards you the location of the hole. Recommended doing this for the whole length of the wall. Then take the railroad ties that should be staggered 6”s to a foot and lay them on top. Now you should know from the markings on the side of your railroad ties where the holes are beneath. At this point you can secure three railroad ties at a time if you so wish. Drill a hole through the next layer of railroad ties at the same place you drilled the lower ties. Now you can take 24” {link} 18” rebar to secure multiple layers of ties. Repeat this process through until you have achieved the desired height and length of retaining wall.
Now you have the sturdiest strongest retaining wall in the neighborhood. This wall or steps or amazing product you’ve created using railroad ties, rebar and serious elbow grease should last you 25 years.